How to Install a Dimmer Switch.
Learning how to install a dimmer for your lighting is an easy task.
Once you know how to wire a light switch, the transition to a dimmer switch is a piece of cake.Dimmer
switches are great for utilizing your lighting for a variety of tasks.
You may want a bright light over the kitchen table for the kids to do
their homework but you don't want to have that romantic dinner under
2000 watts of light. You can then dim the lights to "set the mood".
The installation of a dimmer switch usually starts by removing the existing switch.
Ensure that you have cut the power to the area you are woking on. This is not only a good idea, sometimes the wiring is old and brittle and when removing the existing switch, it could come off and short out on the side of the electrical box... ouch!
Carefully remove the existing switch. You will notice two black wires, two white wires that are connected together and a ground wire (bare). The other option (like the single pole switch) is that you will find a black wire and a white wire along with the ground. (The ground wire may only be attached inside the box.)
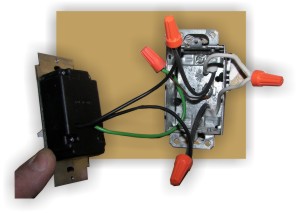
 Take a look at your dimmer switch. You can see that it is much larger
than a regular switch. You will also see that there are two black wires
and a green wire coming out of the switch.The beauty of the dimmer is that it doesn't matter which wire goes where.
Simply twist one of the dimmer wires to one of the wires in the wall and the other wire to the other wire in the wall. Just twist the bare end of the wires together with a pair of pliers and fasten with a wire nut. Then, tape the wire nut to the wire using approximately 3 inches of electrical tape.
Attach the ground wire either to the screw at the back of the electrical box or to the bare ground wire itself with a wire nut.
Voila, you are done.
Bend the wires back into the box and screw the dimmer switch into position.
Attach the cover plate.
Turn on the breaker and test out your new dimmer switch.
Now you are a pro on how to install a dimmer switch.
The installation of a dimmer switch usually starts by removing the existing switch.
Ensure that you have cut the power to the area you are woking on. This is not only a good idea, sometimes the wiring is old and brittle and when removing the existing switch, it could come off and short out on the side of the electrical box... ouch!
Carefully remove the existing switch. You will notice two black wires, two white wires that are connected together and a ground wire (bare). The other option (like the single pole switch) is that you will find a black wire and a white wire along with the ground. (The ground wire may only be attached inside the box.)

Simply twist one of the dimmer wires to one of the wires in the wall and the other wire to the other wire in the wall. Just twist the bare end of the wires together with a pair of pliers and fasten with a wire nut. Then, tape the wire nut to the wire using approximately 3 inches of electrical tape.
Attach the ground wire either to the screw at the back of the electrical box or to the bare ground wire itself with a wire nut.
Voila, you are done.
Bend the wires back into the box and screw the dimmer switch into position.
Attach the cover plate.
Turn on the breaker and test out your new dimmer switch.
Now you are a pro on how to install a dimmer switch.
I like the helpful information you provide in your articles.
ReplyDeleteI will bookmark your weblog and check again here regularly.
I am quite certain I will learn a lot of new stuff right here!
Good luck for the next!
Have a look at my webpage; http://netarticle.biz/
Wow that was odd. I just wrote an incredibly long comment but
ReplyDeleteafter I clicked submit my comment didn't appear. Grrrr... well I'm not writing all
that over again. Regardless, just wanted to say wonderful blog!
Feel free to visit my website sizegenetics review